Once upon a time, in a world consumed by social media, there existed an extraordinary tool that revolutionized the way DTC brands reached their target audience – the Facebook Business Manager.
Imagine yourself as a modern-day eCommerce marketing hero, setting out on a quest to conquer the digital landscape.
Your trusty sidekick in this journey?
None other than the Facebook Business Manager.
So, what exactly is this game-changing tool?
What Is The Facebook Business Manager?
The Business Manager is a comprehensive platform that centralizes the management of your business assets, including Pages, ad accounts, and Instagram profiles.
It is the command center for your social media marketing endeavors, where you can collaborate with team members, agencies, and other partners in real-time.
Why Use The Facebook Business Manager?
Now, you might be wondering, “Why should I use Facebook Business Manager when I’ve been managing my business just fine with my personal Facebook account?”
The answer lies in the myriad of benefits that this platform offers.
The BM provides a more secure environment for your business assets, ensuring that your personal and professional worlds remain separate.
Moreover, it streamlines your advertising efforts by consolidating all your assets in one place, making it easier to track performance, optimize ads, and allocate budgets.
How to setup a Facebook Business Account?
To embark on this digital adventure, you’ll first need to set up your Facebook Business Account. Let me guide you through the process step by step:
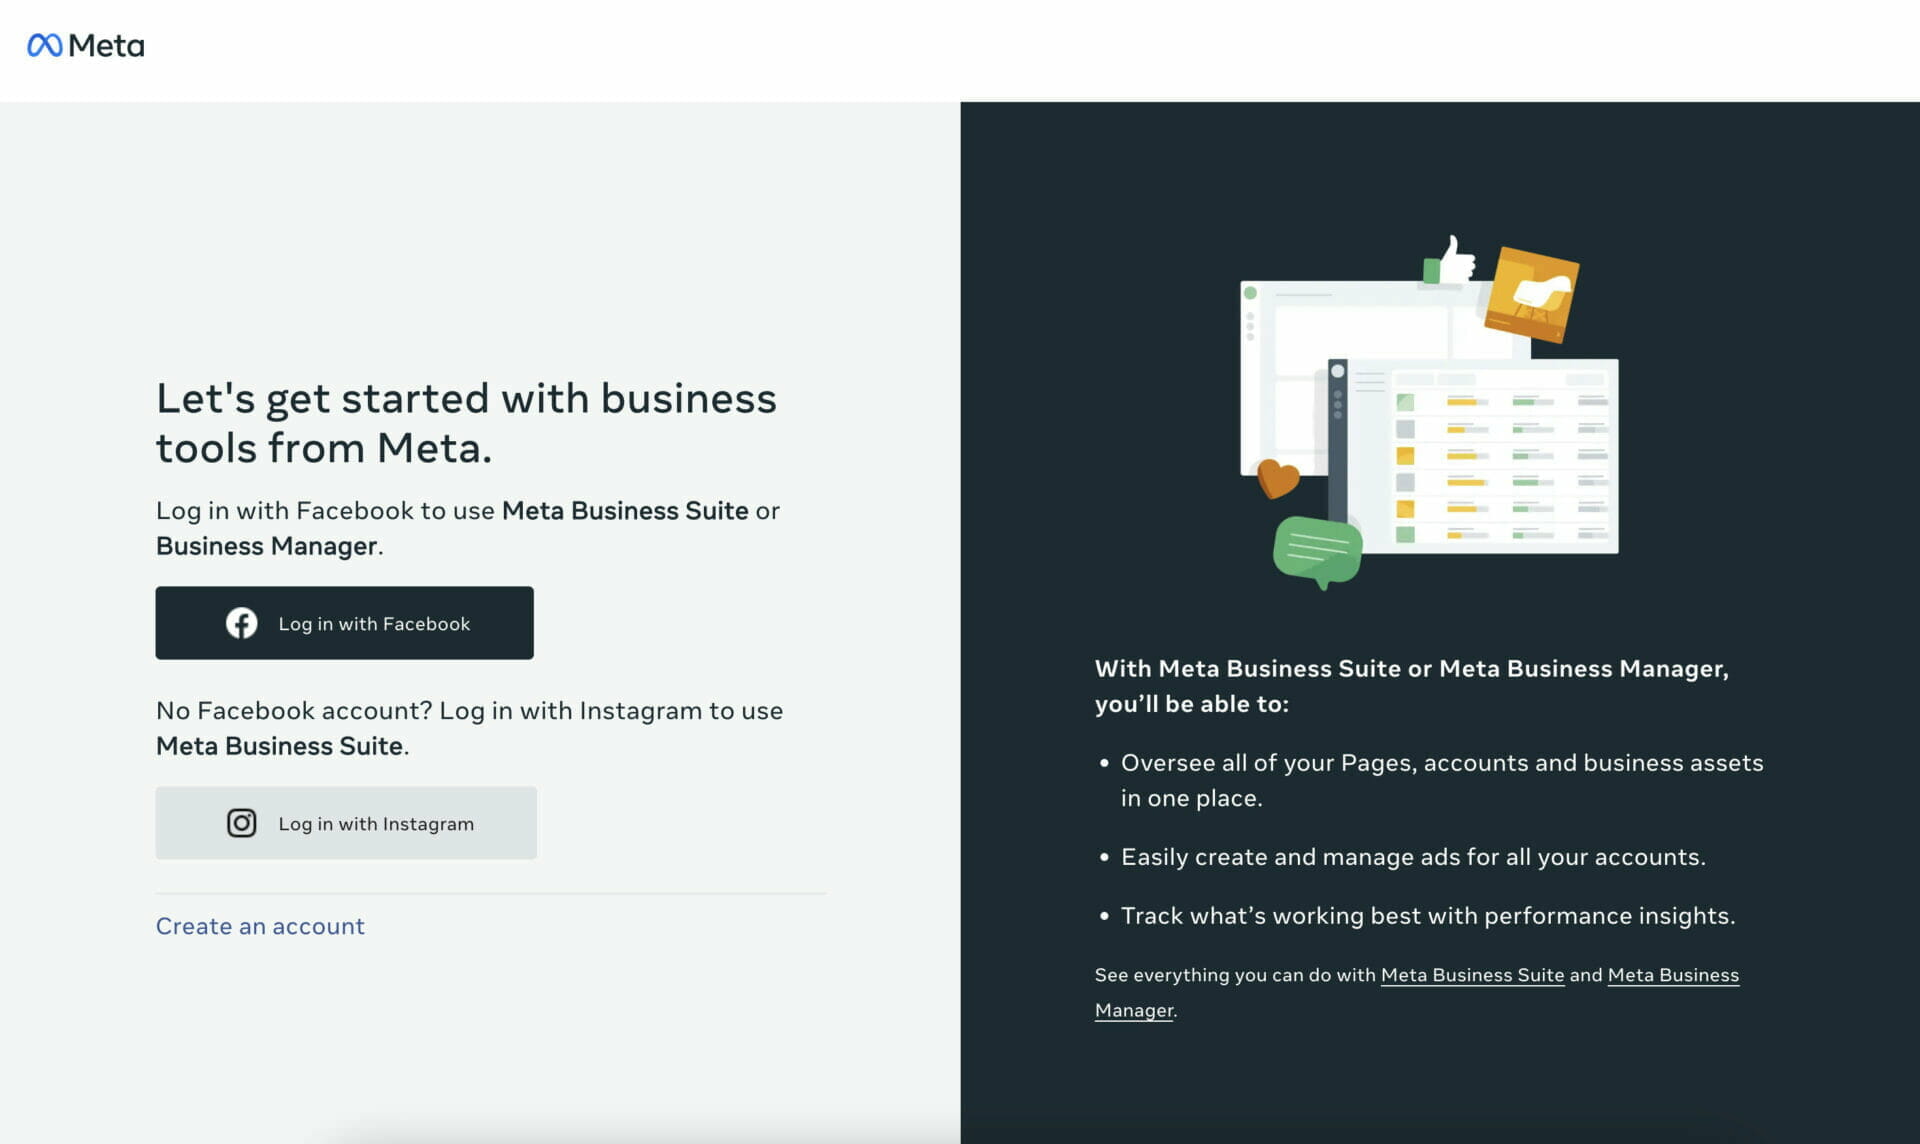
- Sign up for a Facebook Business Manager account: Visit business.facebook.com and click on “Create Account.” Fill in the required information, including your business name, your name, and your business email address.
- Connecting your Facebook BM with your existing Facebook Profile: After signing up, you’ll be prompted to log in to your personal Facebook account. Fear not, my fellow marketing champion, for this step is necessary to verify your identity and ensure that you’re the rightful owner of the account. Rest assured, your personal information will remain separate from your business activities.
And voila!
You’ve successfully set up your Facebook Business Account, and the marketing strategies & marketing funnels awaits!
With this powerful tool by your side, you’re now ready to unlock the full potential of Facebook advertising, reach new heights in audience engagement, and create compelling content that resonates with millions.
As we journey deeper into the realm of the Facebook BM, stay tuned for the next chapter, where we’ll explore the intricacies of managing your business assets and optimizing your campaigns for success.
Setting Up a Facebook Business Account
We laid the foundation for your Business Manager adventure.
Now, it’s time to venture further and delve into the process of setting up your Business Account.
To ensure your success, I’ll guide you through each step, from meeting the necessary requirements to configuring and optimizing your business settings.
Requirements to set up a Facebook Business Account
Before embarking on this digital quest, you must first ensure that you meet the following requirements:
- Have a personal Facebook account: You’ll need a personal Facebook account to confirm your identity and create your Business Manager account. If you don’t have one yet, sign up at facebook.com.
- Be an admin of your business’s Facebook Page: If your business already has a Facebook Page, you must have admin access to connect it to your Business Manager account.
- Use a business email address: To maintain professionalism and separate your personal and professional communications, use a business email address when signing up for your Facebook Business Manager account.
Step by step guide to setting up a Facebook Business Account
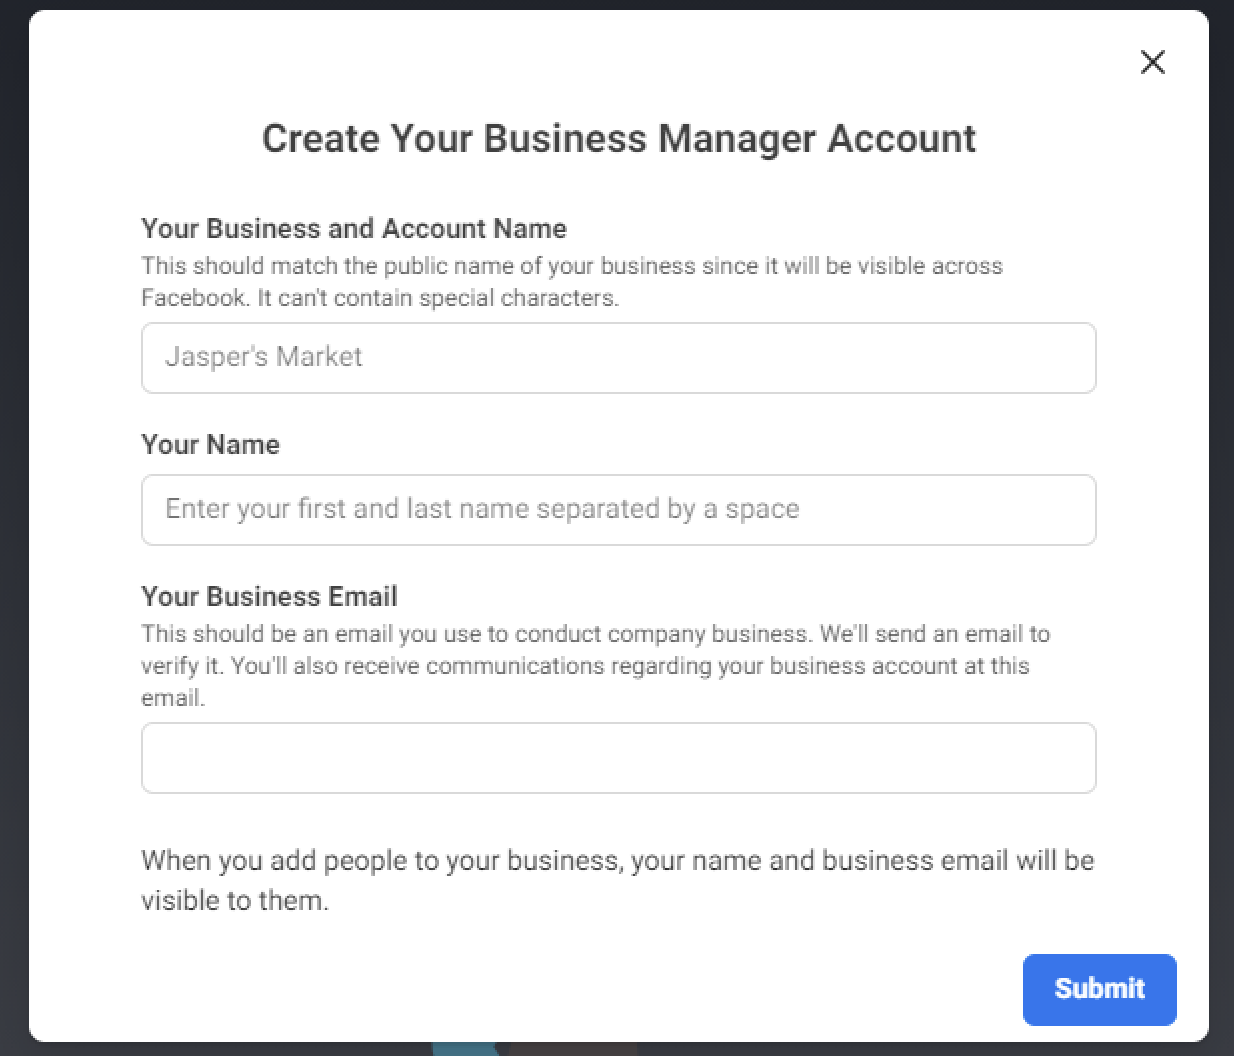
Creating a Facebook Business Manager account:
- Visit business.facebook.com and click on “Create Account” (as shown above).
- Enter your business name, your name, and your business email address.
- Log in to your personal Facebook account when prompted to verify your identity.
- Remember, this step keeps your personal and professional activities separate.
Adding your business details:
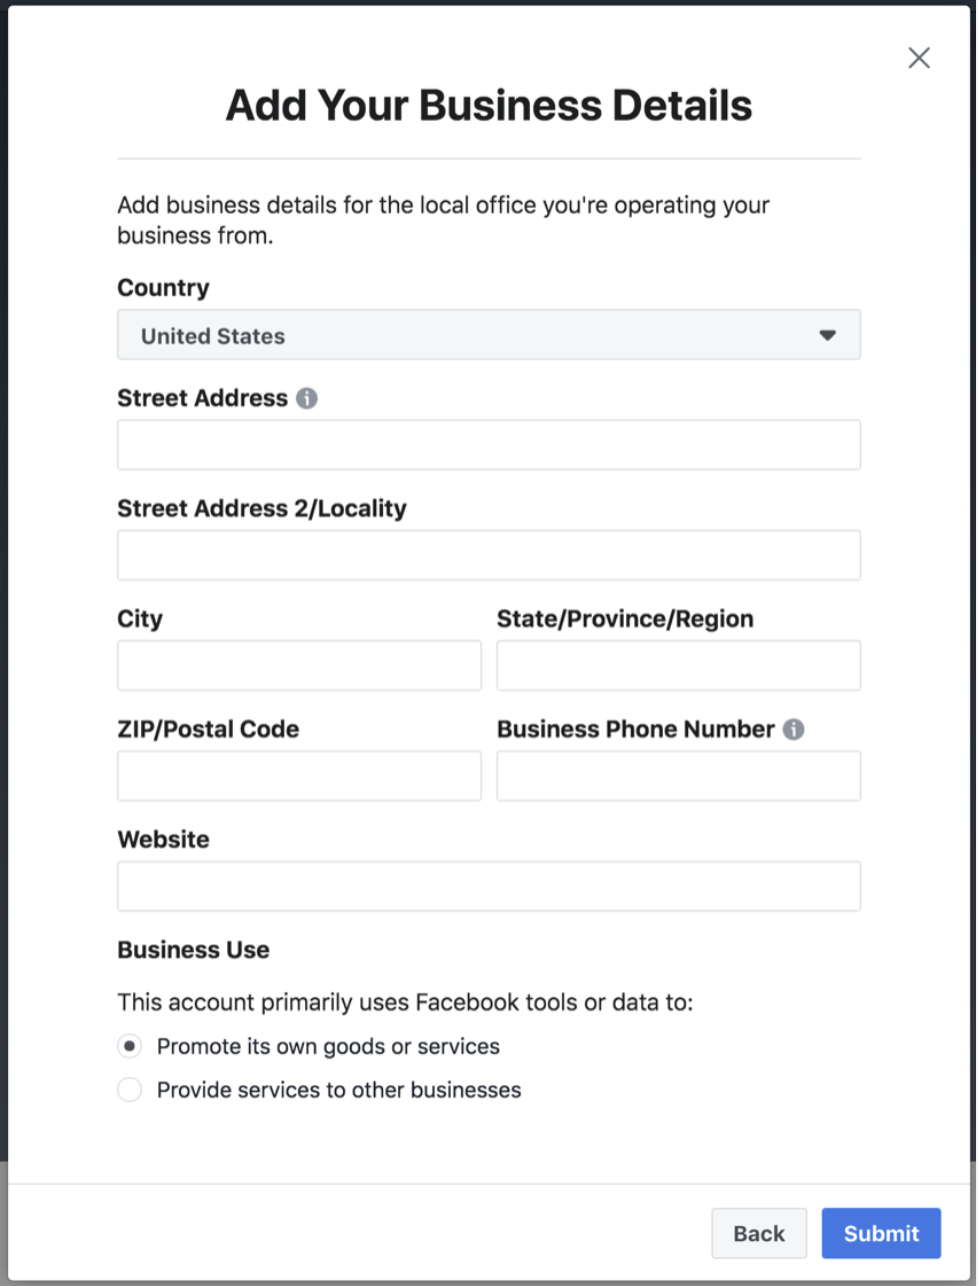
Once you’ve created your Facebook Business Manager account, you’ll be directed to the Business Manager dashboard.
- Click on the “Business Settings” button in the top right corner.
- Navigate to the “Business Info” tab on the left-hand side.
- Fill in your business details, including your business’s legal name, address, phone number, and website.
- This information is crucial for customers to find and contact your business.
Configuring business settings:
Now that your business information is in place, it’s time to configure and optimize your business settings to maximize your success.
Adding a Facebook Page:
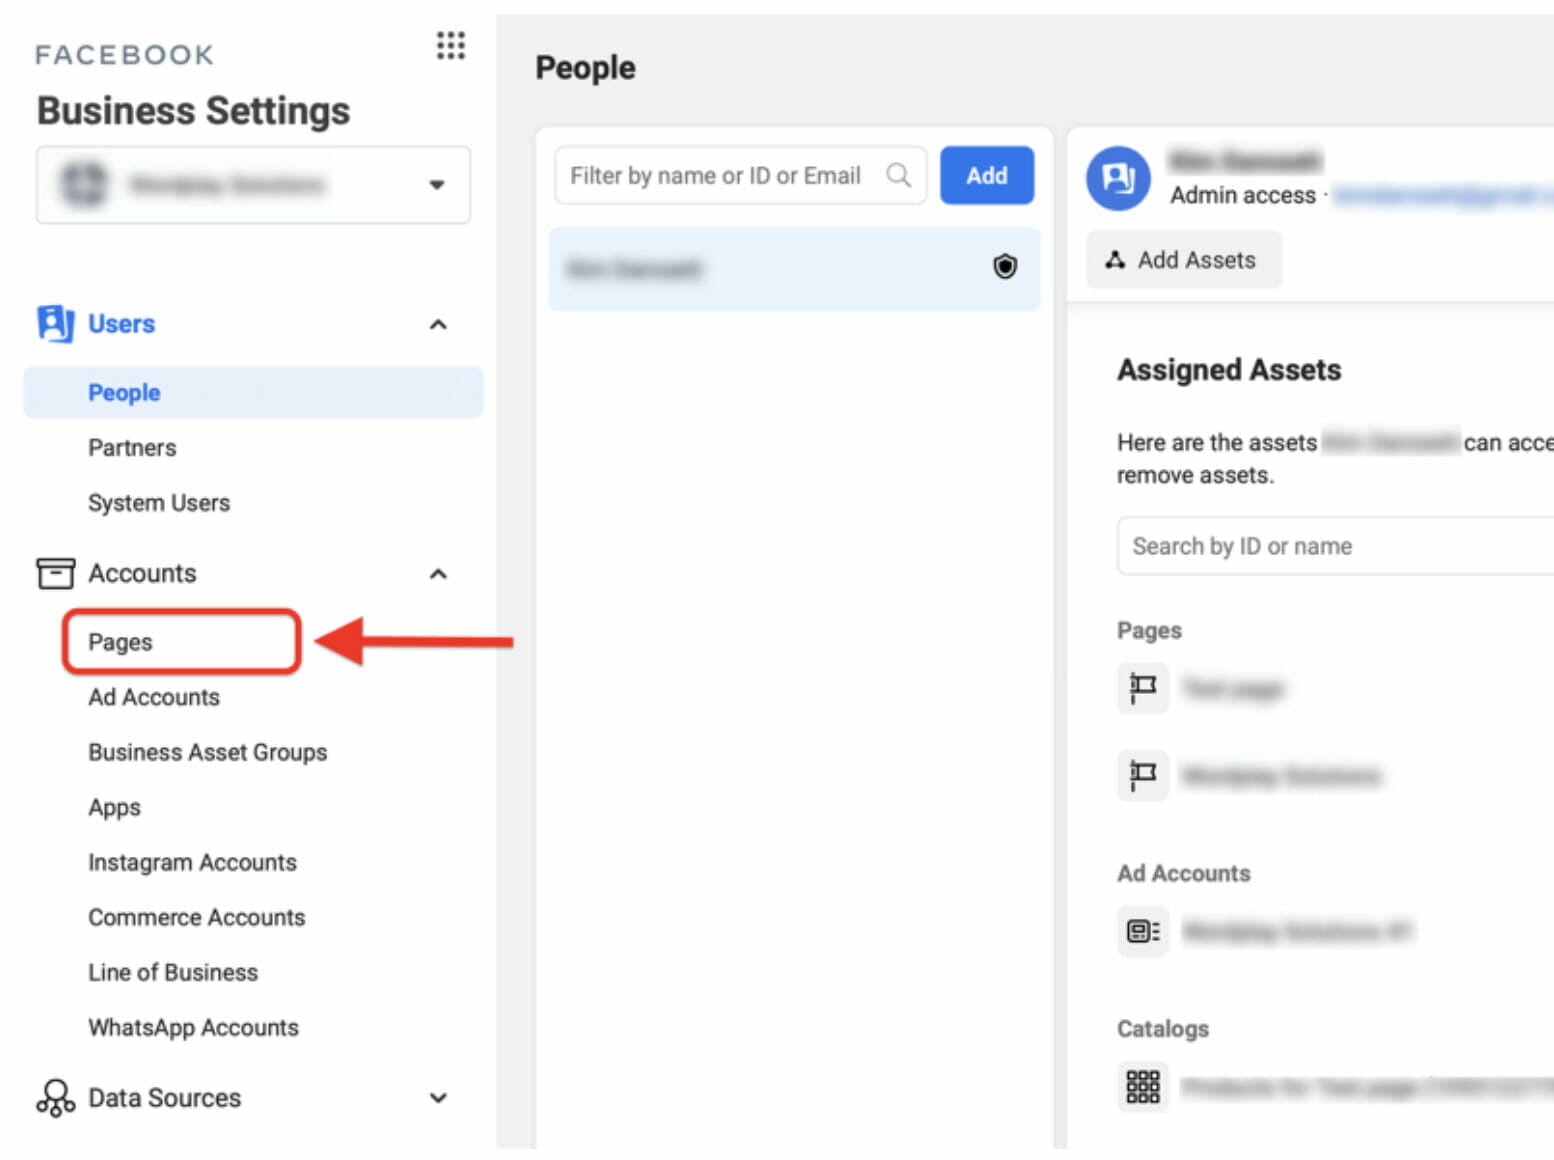
- If you haven’t already created a Facebook Page for your business, click on the “Pages” tab in the Business Settings menu and select “Add.”
- Follow the prompts to create a new Page.
- If you already have a Page, click “Add Page” and enter the name or URL of your existing Page.
Connecting your Instagram account:
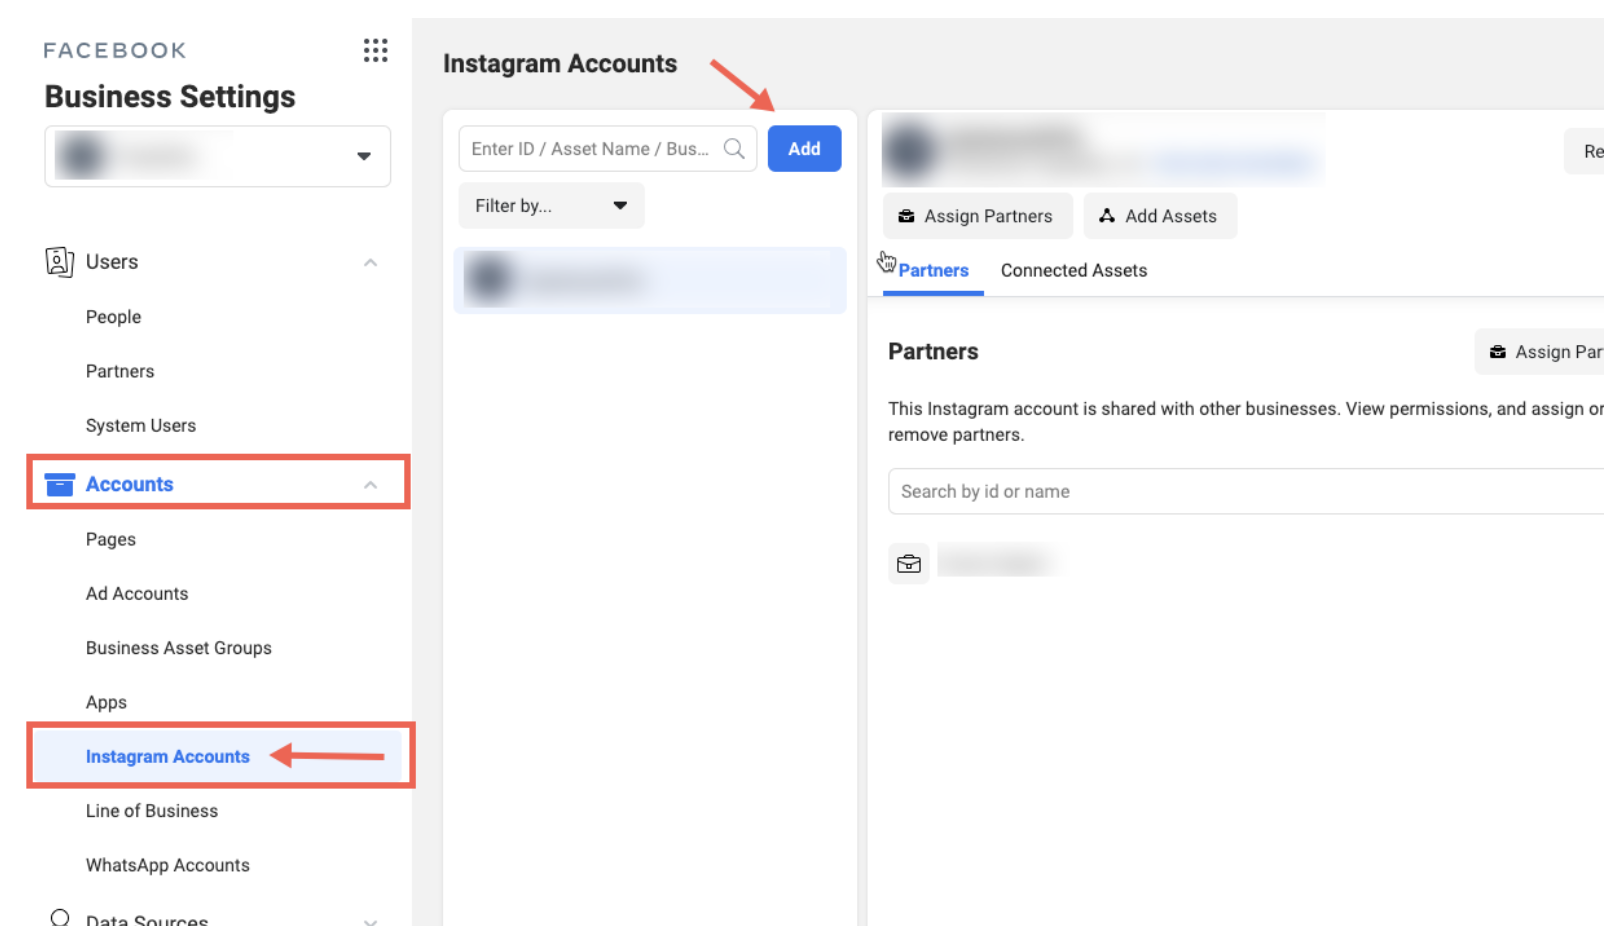
- To manage your Instagram presence alongside your Facebook efforts, click on the “Instagram Accounts” tab in the Business Settings menu and select “Add.”
- Log in to your Instagram account and authorize the connection.
Adding Ad Accounts:
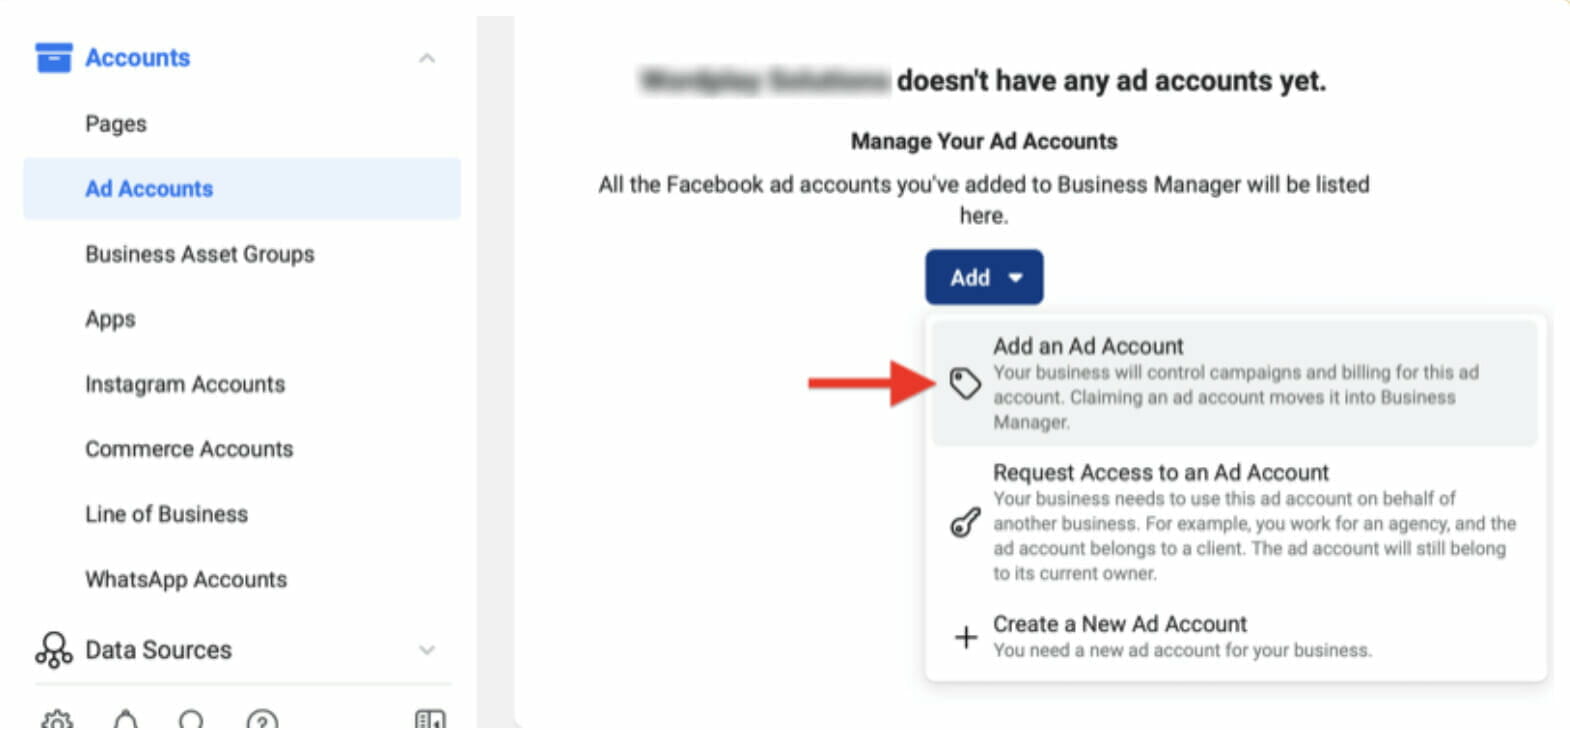
- To manage your ad campaigns, navigate to the “Ad Accounts“ tab in the Business Settings menu and click “Add.”
- You can either create a new ad account or request access to an existing one.
Assigning roles and permissions:
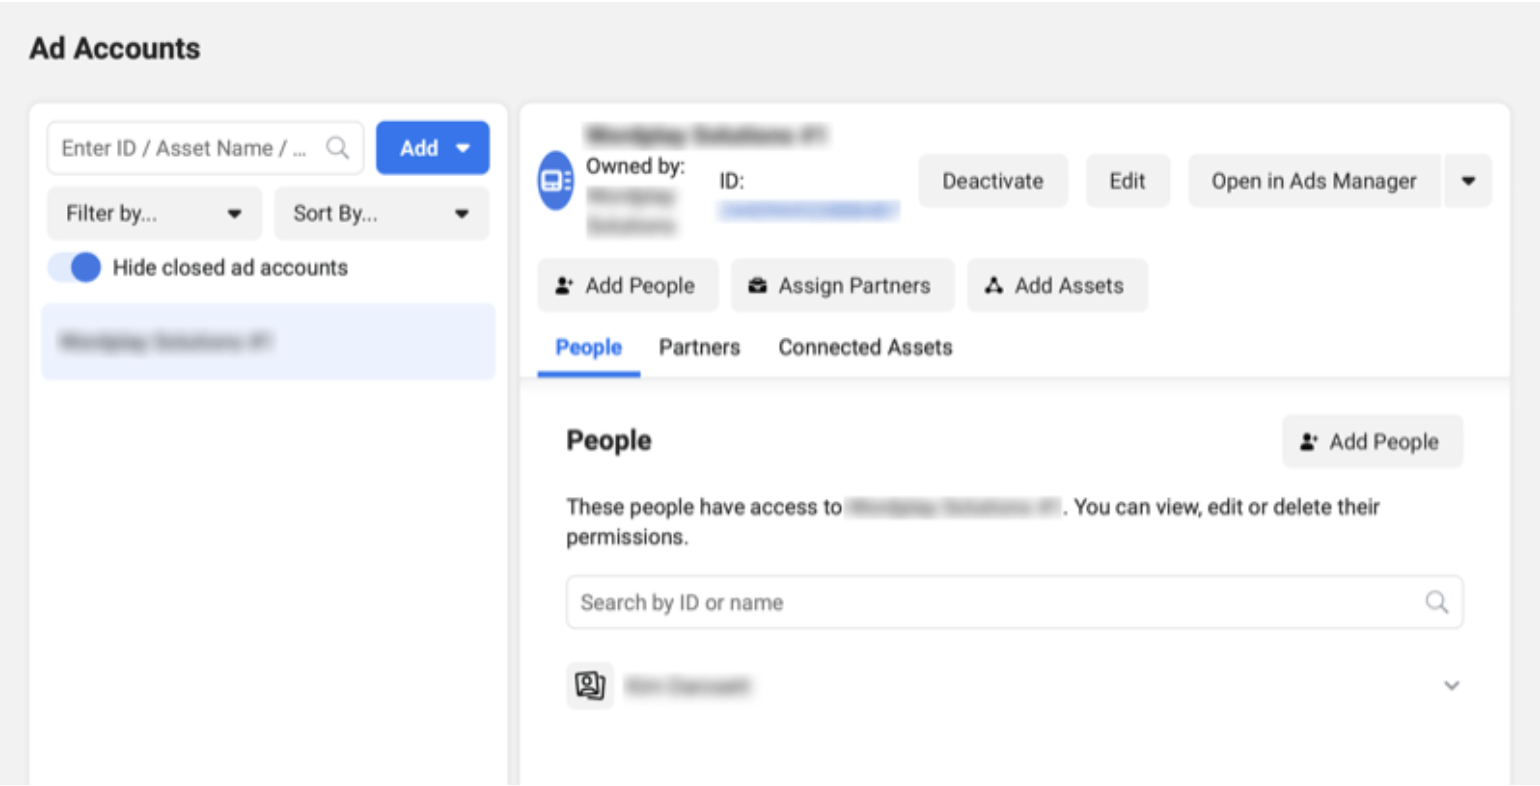
- To collaborate with team members, agencies, and partners, click on the “People” tab in the Business Settings menu and select “Add.”
- Assign the appropriate roles and permissions for each person, ensuring they have access to the necessary assets.
Setting up Facebook Pixel:
- To track user behavior on your website and optimize your ad campaigns, navigate to the “Data Sources” tab in the Business Settings menu and click on “Pixels.”
- Follow the prompts to create a new Facebook Pixel and implement it on your website.
Integrating your product catalog:
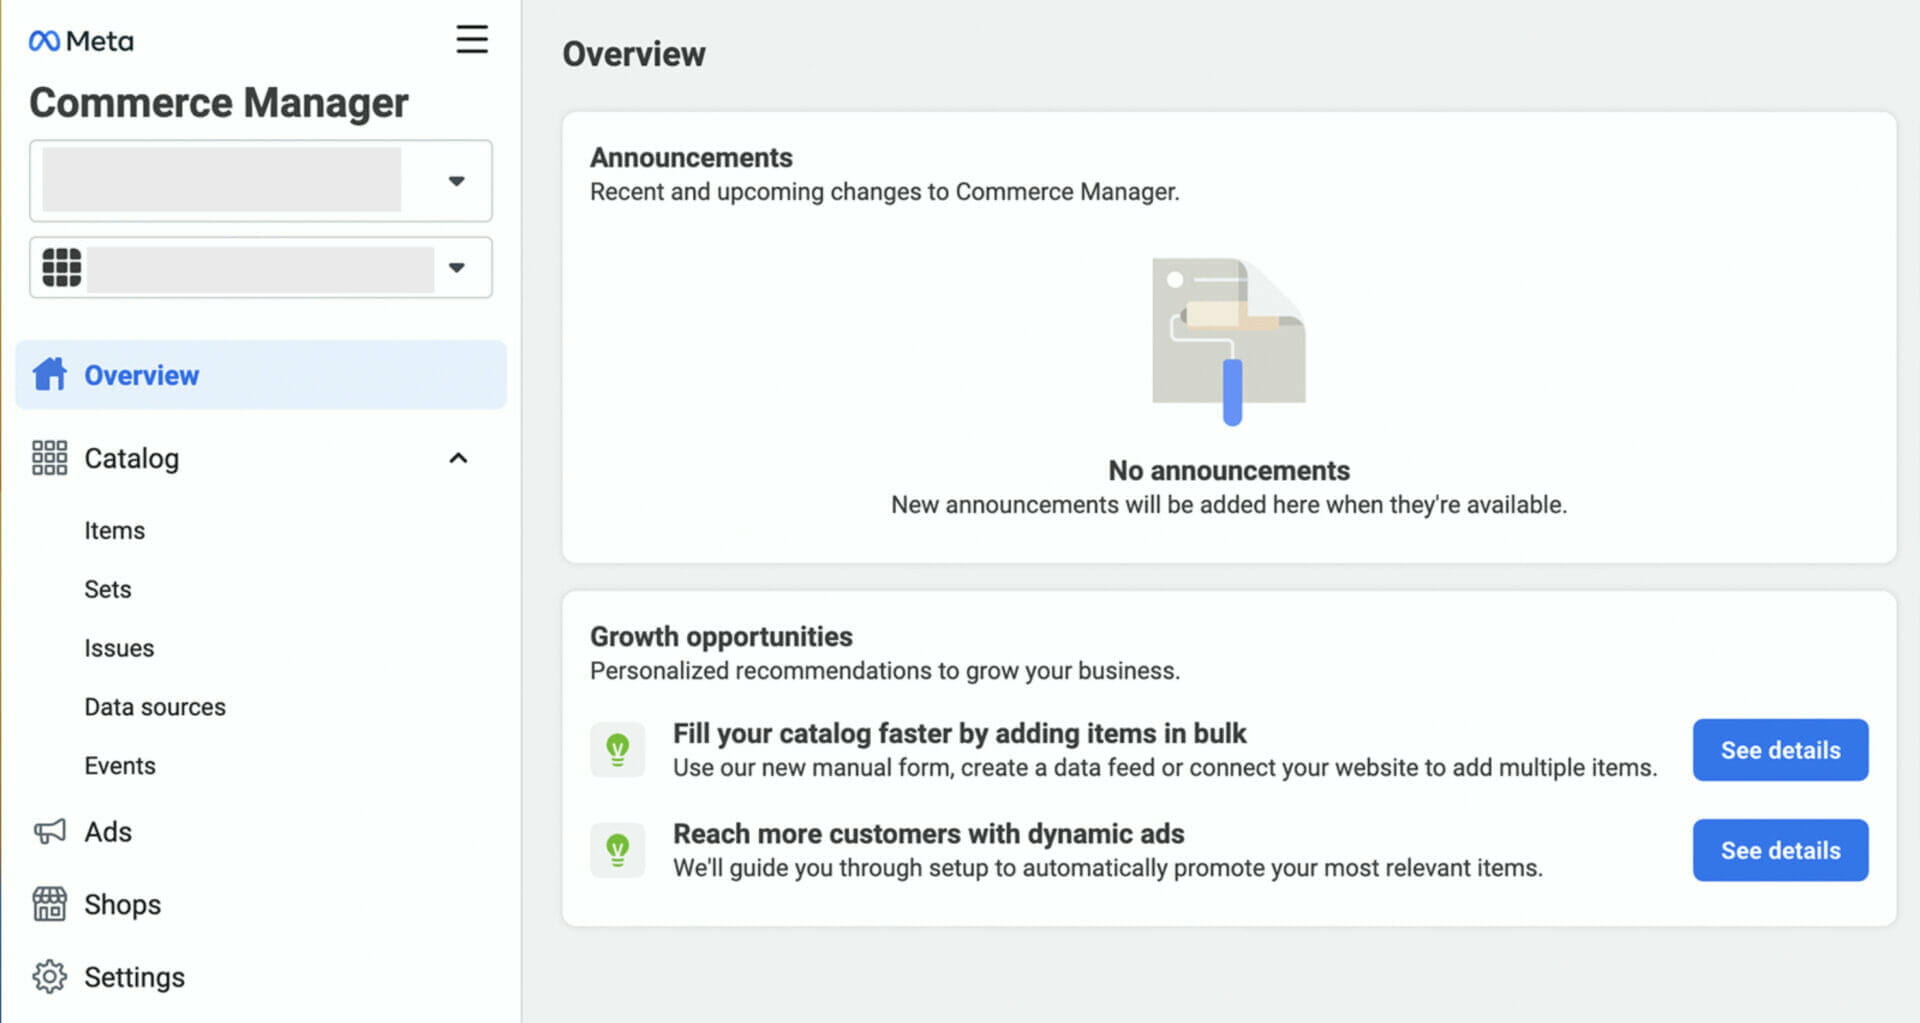
- To showcase your products on Facebook and Instagram, click on the “Catalogs” tab in the Business Settings menu and select “Add Catalog.”
- Follow the instructions to create a catalog and add your products.
And there you have it – your Facebook Business Account is now set up and ready to help you conquer the digital marketing landscape!
With each step, you’ve unlocked new opportunities to reach your target audience, optimize your campaigns, and engage with your customers like never before.
As you move forward on this marketing quest, remember to stay agile and adaptive.
Regularly review your business settings, keeping an eye out for new features and updates that Facebook introduces.
Embrace the ever-evolving social platforms and use your newfound powers to propel your business to unprecedented heights.
Setting Up a Facebook Page for Business: Tips & Best Practices
As we continue our adventure through the Facebook Business Manager, we now find ourselves at the cornerstone of any successful social media content strategy: the Facebook Page.
This digital fortress serves as the face of your brand and the gateway to connecting with your audience.
Let’s uncover the secrets to setting up your Page, optimizing its settings, engaging with your audience, crafting effective content strategies, and collaborating with your team.
How to setup a Facebook Business Page:
- Log in to your Facebook Business Manager account and navigate to the “Pages” tab in the Business Settings menu.
- Click “Add” and choose “Create a New Page.”
- Select the “Business or Brand“ option.
- Enter your business name, select a category that best describes your business, and provide a brief description.
- Upload a profile picture and cover photo that accurately represent your brand.
- Click “Create Page,” and your new Facebook Page for Business will be live.
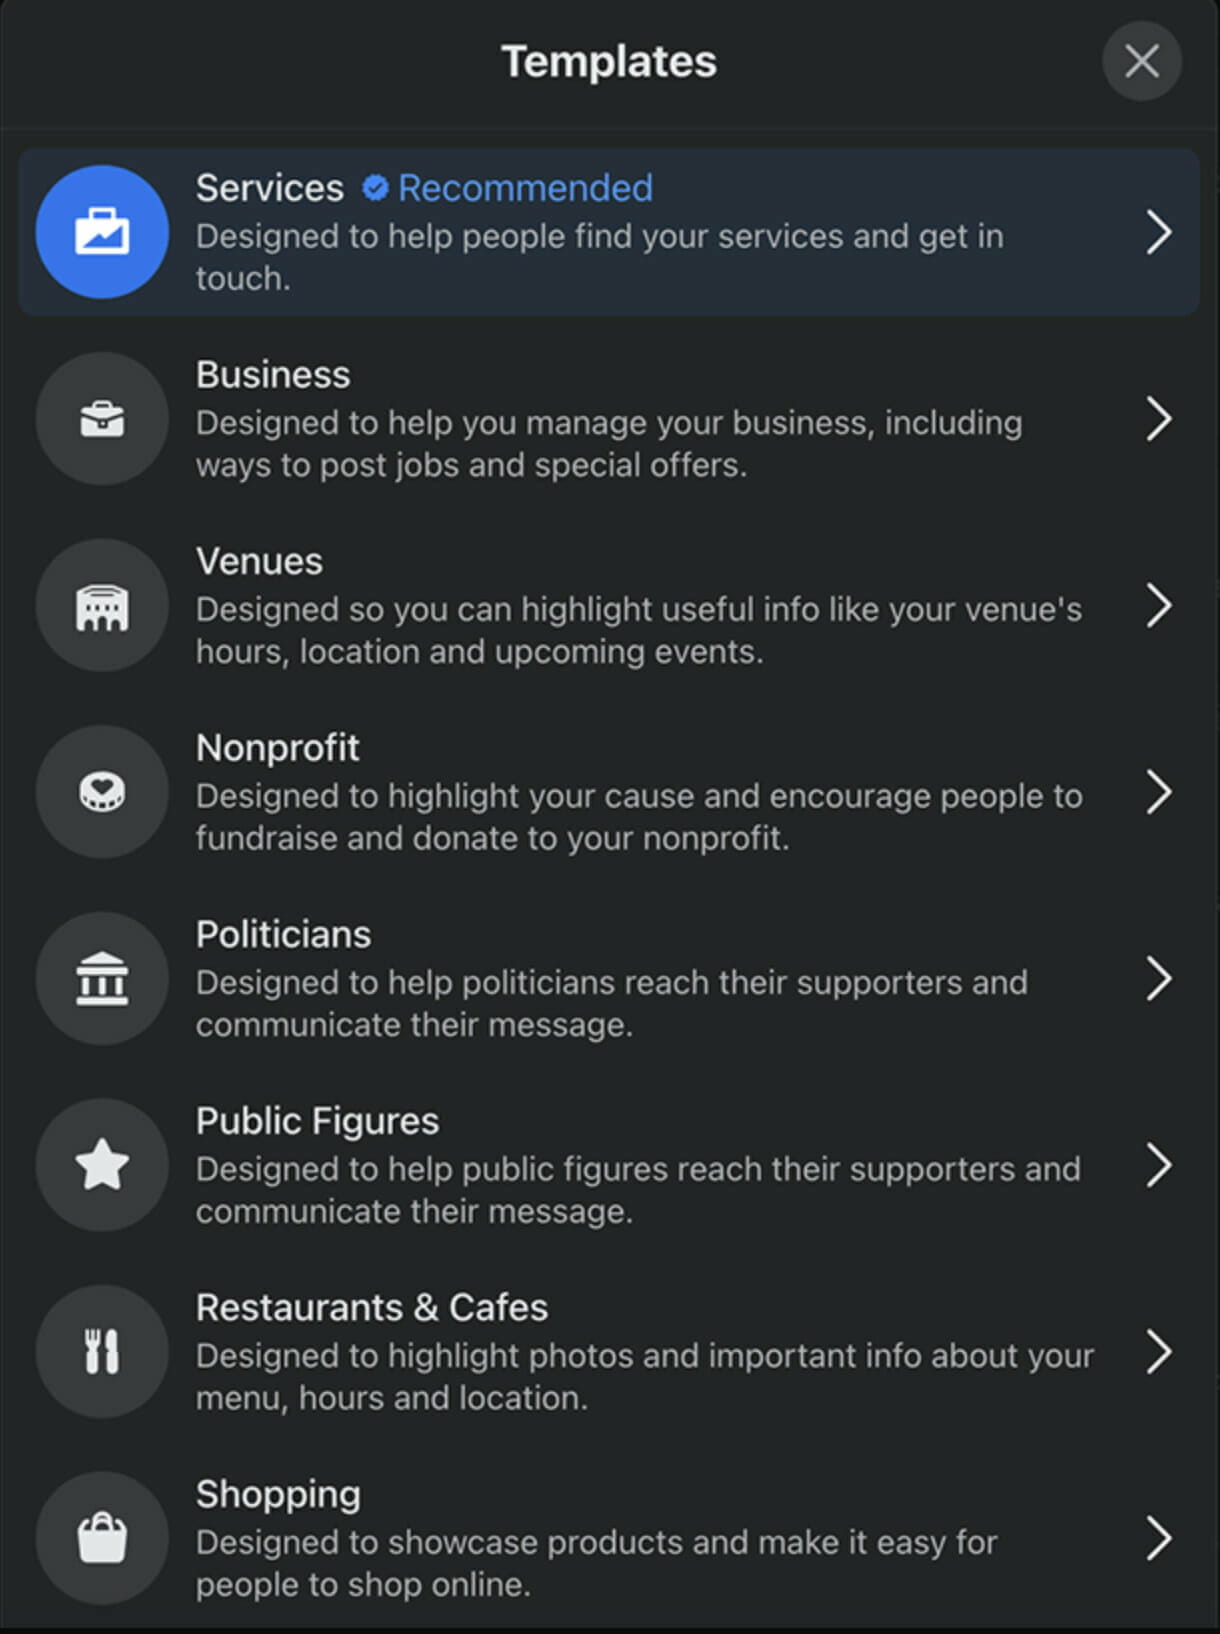
Optimize page settings:
- Customize your page’s username (URL) by clicking “Create Page @username” in the left menu. Choose a username that is easy to remember and consistent with your other online presences.
- Add a call-to-action button under your cover photo to encourage visitors to take a specific action, such as visiting your website, making a reservation, or contacting you.
- Complete the “About” section with essential information about your business, including your website, contact information, operating hours, and a detailed description of your products or services.
- Enable reviews and recommendations, allowing customers to share their experiences with your business.
- Adjust your page’s visibility settings to make it discoverable by search engines and Facebook users.
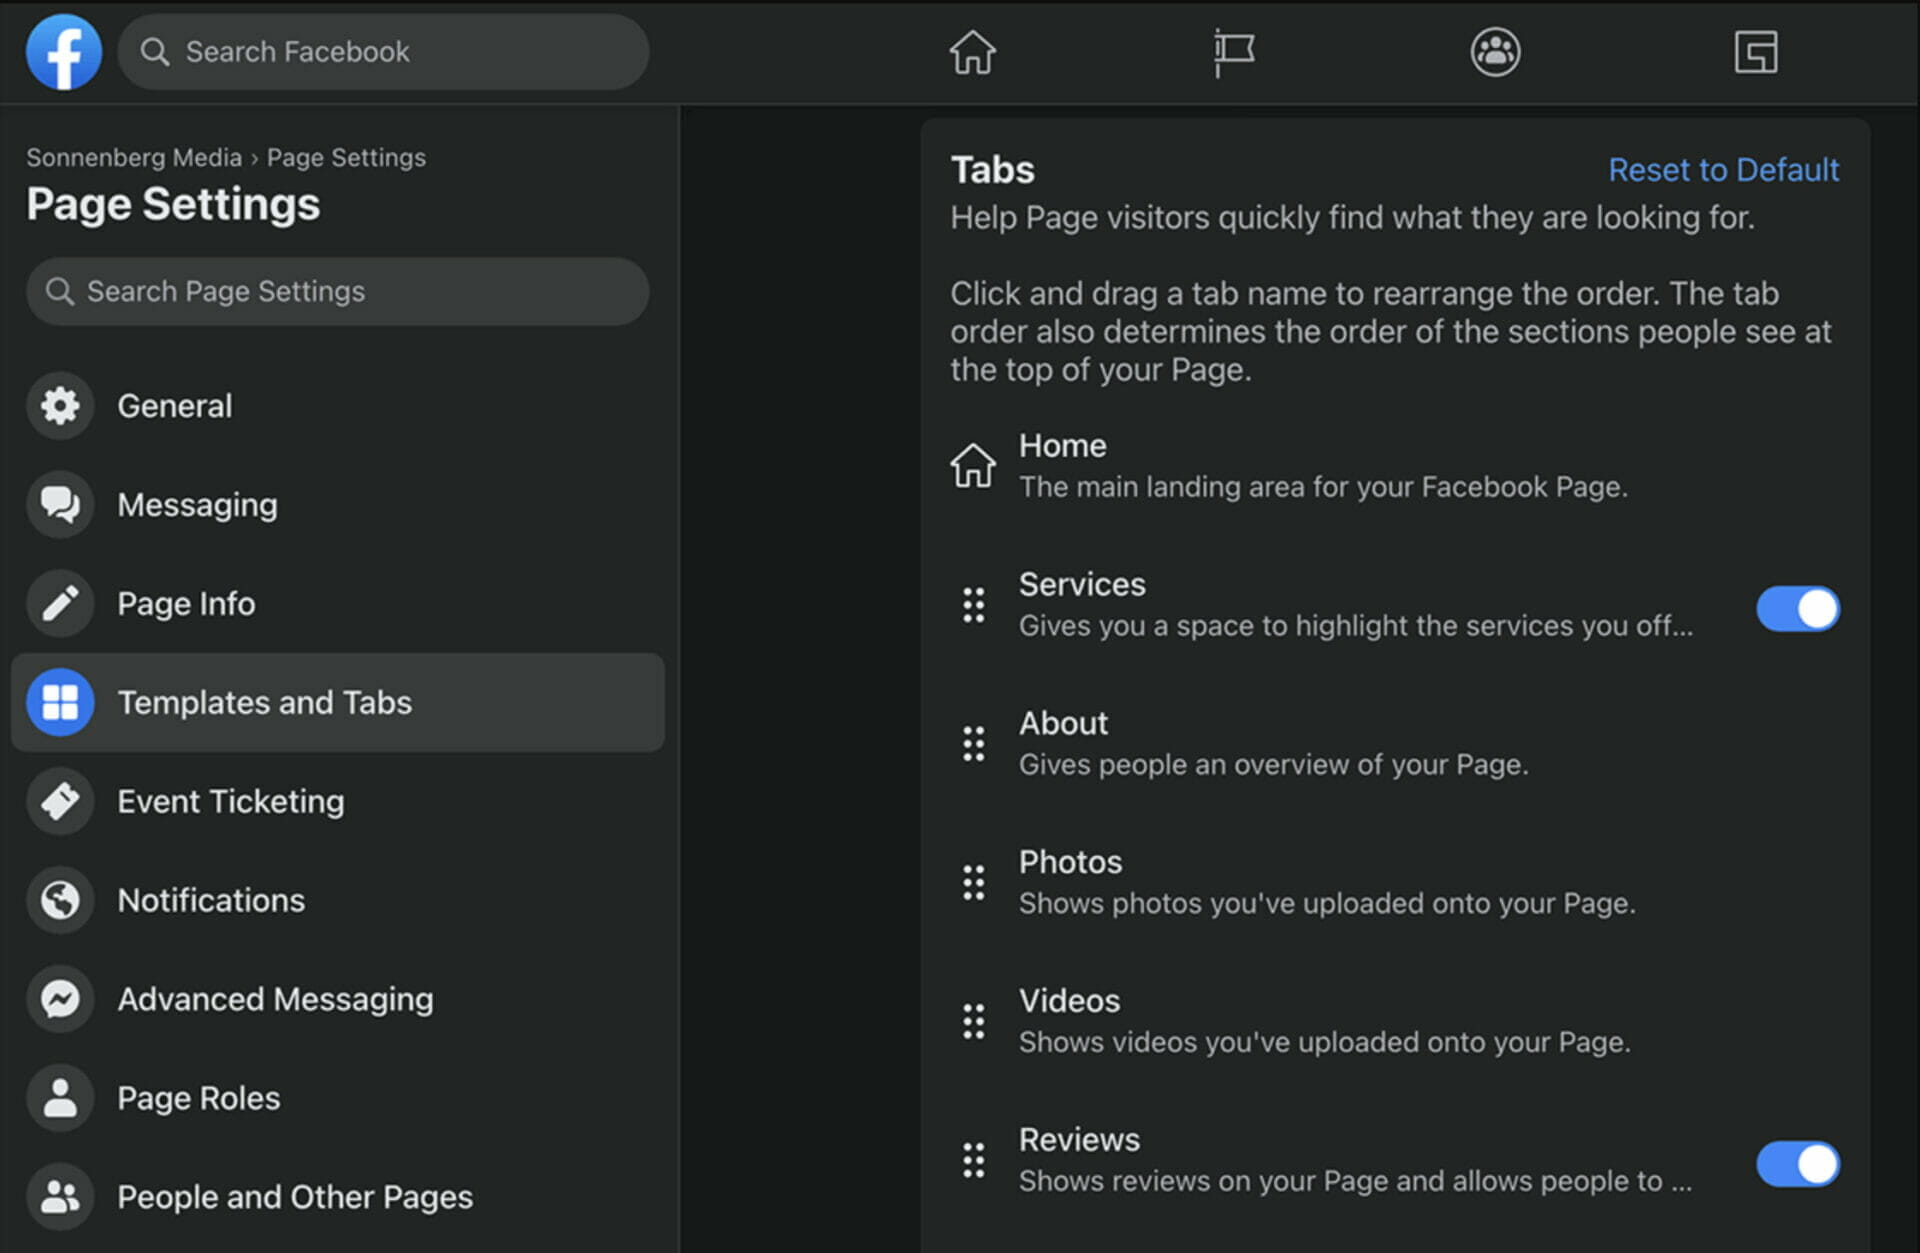
Engaging and connecting with your audience:
- Publish regular updates, including news, promotions, and behind-the-scenes content, to keep your audience informed and engaged.
- Respond to comments, messages, and reviews promptly, showcasing your dedication to customer service and fostering a sense of community.
- Utilize Facebook Live to host Q&A sessions, webinars, or product demonstrations, allowing your audience to interact with you in real-time.
- Share user-generated content ideas to encourage engagement and showcase your customers’ experiences with your brand.
Effective content strategies for increased visibility and reach:
- Create a content calendar to maintain a consistent posting schedule and ensure a diverse mix of content types (articles, videos, images, polls, etc.).
- Monitor your page’s analytics to identify high-performing content and adapt your strategy accordingly.
- Leverage Facebook’s native video platform to share engaging video content that autoplay in users’ News Feeds.
- Utilize Facebook Stories to share timely updates and showcase your brand’s personality.
- Employ Facebook Ads to extend your content’s reach and target specific audience segments based on demographics, interests, and behaviors.
Collaborating with team members and assigning roles:
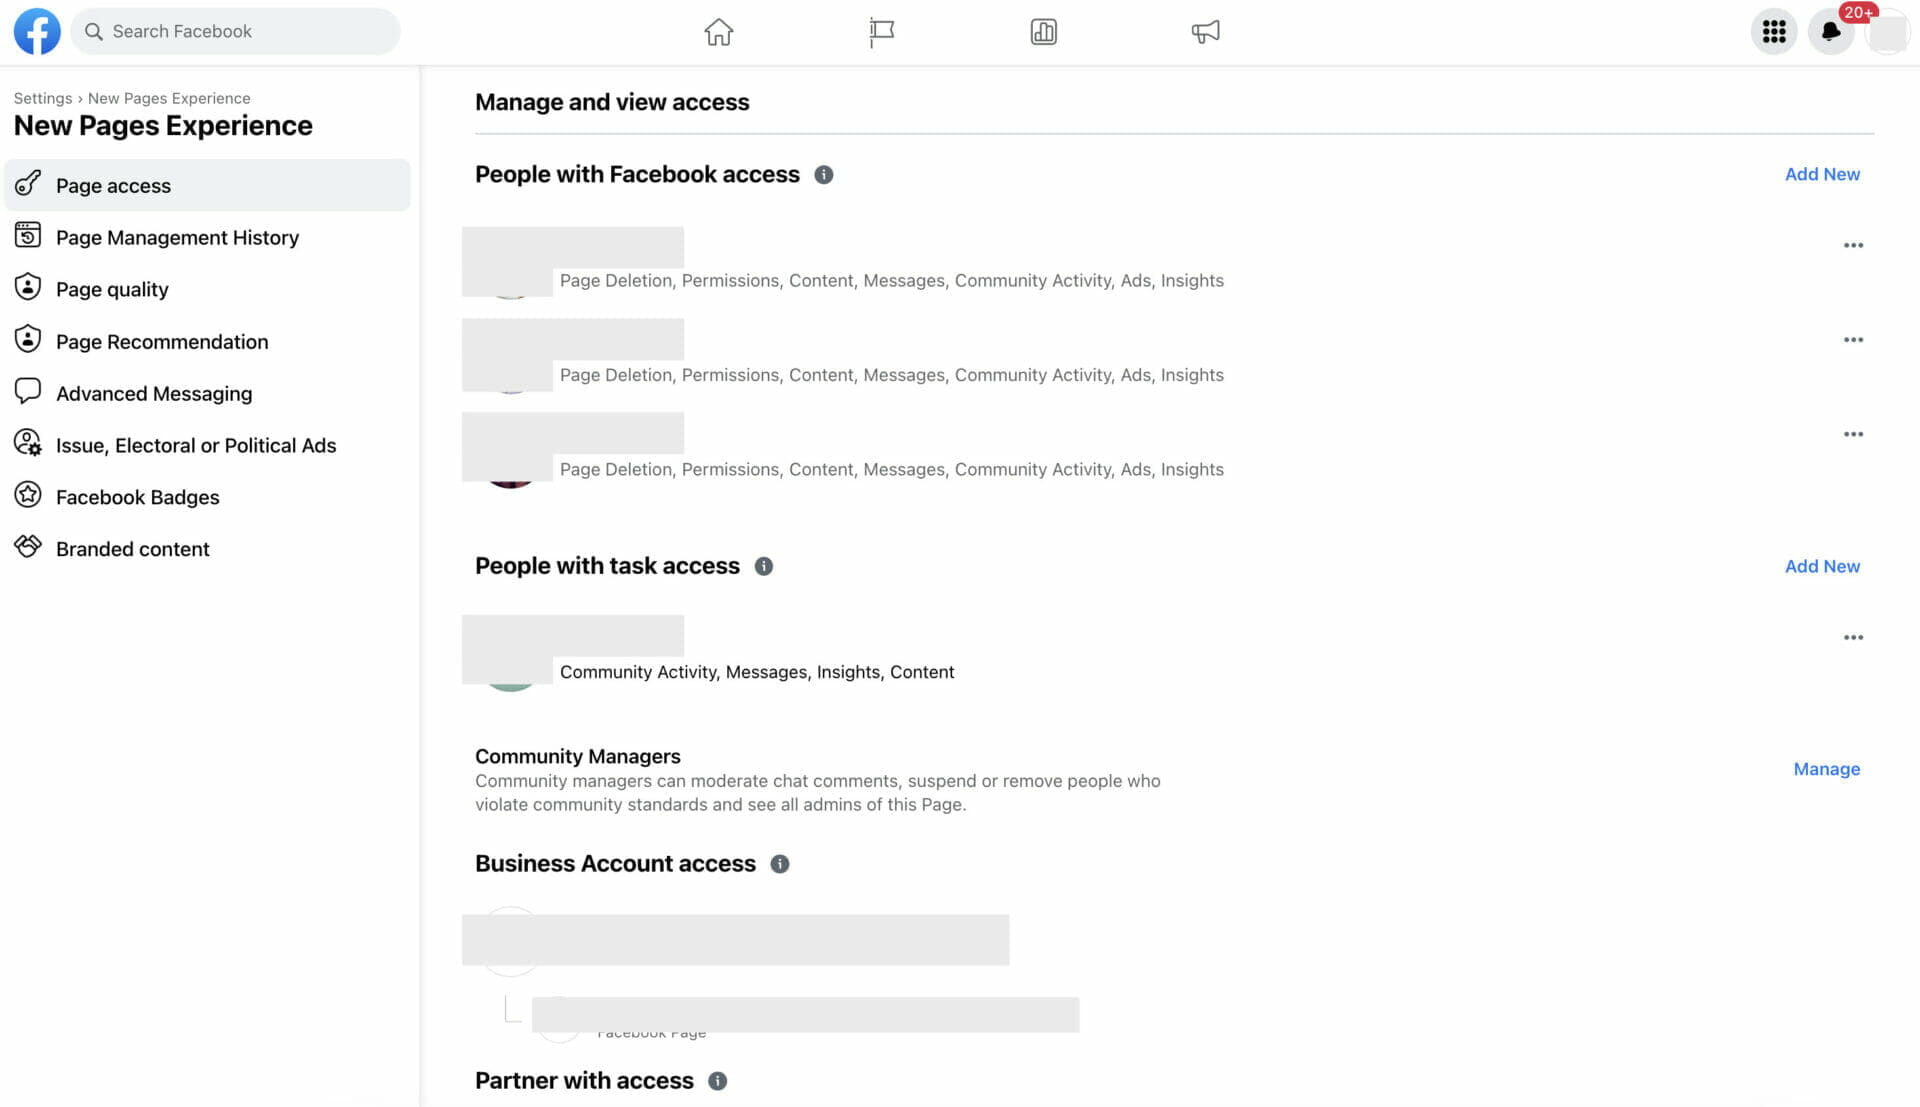
- In your Facebook Business Manager account, click on the “People” tab in the Business Settings menu.
- Click “Add” and enter the email address of the team member you’d like to invite.
- Assign the appropriate role (Admin, Editor, Moderator, etc.) based on the individual’s responsibilities within your organization. Ensure that each team member has access to the necessary assets and tools.
- Provide clear guidelines and expectations for team members to ensure a cohesive and consistent brand presence on your Facebook Page for Business.
With your Facebook Page for Business now set up, optimized, and primed for success, you’re ready to embark on an exciting journey of audience engagement, content creation, and brand growth.
By mastering these best practices, you’ll be able to cultivate meaningful connections with your audience, develop a loyal community of customers, and ultimately, drive your business to new heights.
Navigating the Facebook Page Manager
As we begin flying closer to the sun, we come upon a powerful tool that will prove invaluable in managing your Facebook Business Manager – the Facebook Page Manager.
We’ll provide you with a map to navigate the Page Manager, integrate other platforms, and leverage Facebook Ads to drive business growth.
What is the Facebook Page Manager?
The Page Manager is a standalone app that enables you to manage your Facebook Business Page directly from your mobile device.
With an array of features and functionalities designed to streamline your social media marketing efforts, the Page Manager is a valuable companion in your quest for digital success.
Overview of the Facebook Page Manager features and functionalities:
- Manage multiple Pages and accounts: The Facebook Page Manager allows you to manage multiple Pages and accounts from a single app, making it easy to switch between different business profiles.
- Schedule and publish posts: Create, schedule, and publish content directly from the app to keep your audience engaged and informed.
- Analyze insights and performance metrics: Access detailed analytics to track the performance of your content and identify trends, helping you optimize your content strategy.
- Respond to messages and comments: Monitor and respond to messages, comments, and reviews in real-time, fostering a sense of community and showcasing your commitment to customer service.
How to use the Facebook Page Manager?
Managing multiple pages and accounts:
- Download the Facebook Page Manager app on your mobile device.
- Log in with your Facebook credentials.
- If you manage multiple Pages, you’ll see a list of all the Pages you have access to. Tap on the Page you want to manage.
Schedule and Publish Posts:
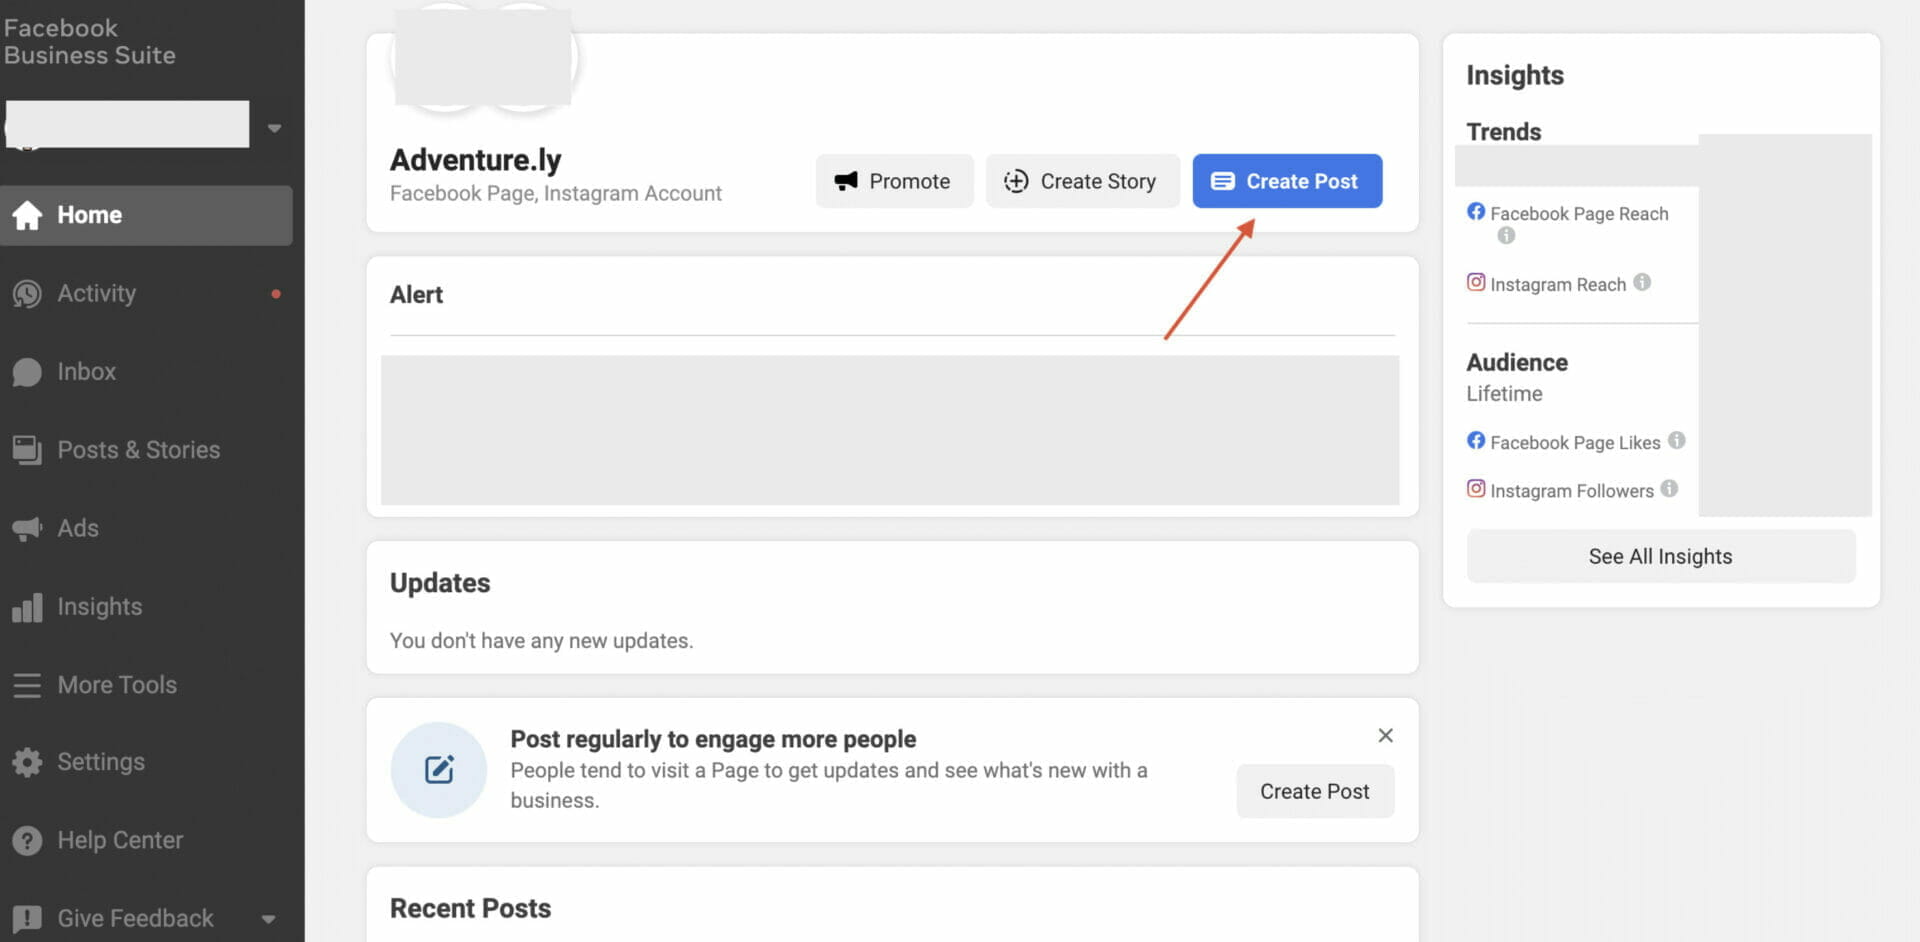
- Tap the “Create Post” button.
- Craft your post by adding text, images, or video.
- If you want to schedule the post, tap on the “Publish” button and select “Schedule Post.” Choose a date and time for your post to go live.
- Tap “Schedule” to finalize your post, or “Publish” to post it immediately.
Analyzing insights and performance metrics:
- Tap on the “Insights” tab at the bottom of the screen.
- Here, you’ll find an overview of your Page’s performance, including metrics like reach, engagement, and follower growth.
- Dive deeper into specific sections like “Posts,” “Events,” and “Videos” to analyze performance for individual content types.
Responding to messages and comments:
- To respond to comments, tap on the “Notifications” tab at the bottom of the screen. You’ll see a list of recent comments on your posts. Tap on a comment to reply directly from the app.
- To manage messages, tap on the “Inbox” tab. Here, you can view and respond to messages from your Page’s followers.
As you master the Facebook Page Manager and its powerful features, you’ll unlock new opportunities to connect with your audience, optimize your content, and grow your business.
In the next chapter, we’ll delve into the world of integrating other platforms with your new Facebook Business Manager.
And explore the power of Facebook Ads for marketing and targeting customers, equipping you with the tools and knowledge you need to conquer the digital marketing landscape.
Integrating Other Tools With Facebook Business Manager
As our digital marketing odyssey continues, we come to a crucial aspect of harnessing the full power of the Business Manager:
Integrating other tools and platforms.
This chapter will guide you through the process of connecting Instagram and WhatsApp accounts, setting up Facebook Pixel for tracking conversions, and integrating Facebook Ads with other platforms.
Connecting Instagram and WhatsApp accounts
Integrating your Instagram and WhatsApp accounts with your Facebook Business Manager allows you to manage all three platforms from one central location, streamlining your marketing efforts and fostering a cohesive brand presence across different channels.
Connecting Instagram:
- Log in to your Facebook Business Manager account and navigate to the “Business Settings” menu.
- Click on the “Instagram Accounts” tab on the left-hand side.
- Click the “Connect Account” button and enter your Instagram login credentials.
- Once connected, you can assign team members to manage the account and grant them the necessary permissions.
Connecting WhatsApp:
- Log in to your Facebook Business Manager account and navigate to the “Business Settings” menu.
- Click on the “WhatsApp Accounts” tab on the left-hand side.
- Click the “Add” button and follow the prompts to connect your WhatsApp Business account.
- Once connected, you can assign team members to manage the account and grant them the necessary permissions.
Setting up Facebook Pixel for tracking conversions
Facebook Pixel is a powerful tool that allows you to track user behavior and conversions on your website, providing valuable insights for optimizing your ad campaigns and improving your marketing ROI.
Create a Facebook Pixel:
- Log in to your Facebook Business Manager account and navigate to the “Events Manager” menu.
- Click the “Connect Data Sources” button and select “Web.”
- Choose “Facebook Pixel” and click “Connect.”
- Enter a name for your Pixel, add your website’s URL, and click “Continue.”
Add the Pixel code to your website:
- Copy the generated Pixel code from the Facebook Business Manager.
- Paste the code into the header of your website or use a tag management solution like Google Tag Manager to implement the Pixel.
- Verify that the Pixel is functioning correctly by using the “Test Events” feature in the Events Manager.
Set up conversion events:
- In the Events Manager, click on your Pixel and navigate to the “Settings” tab.
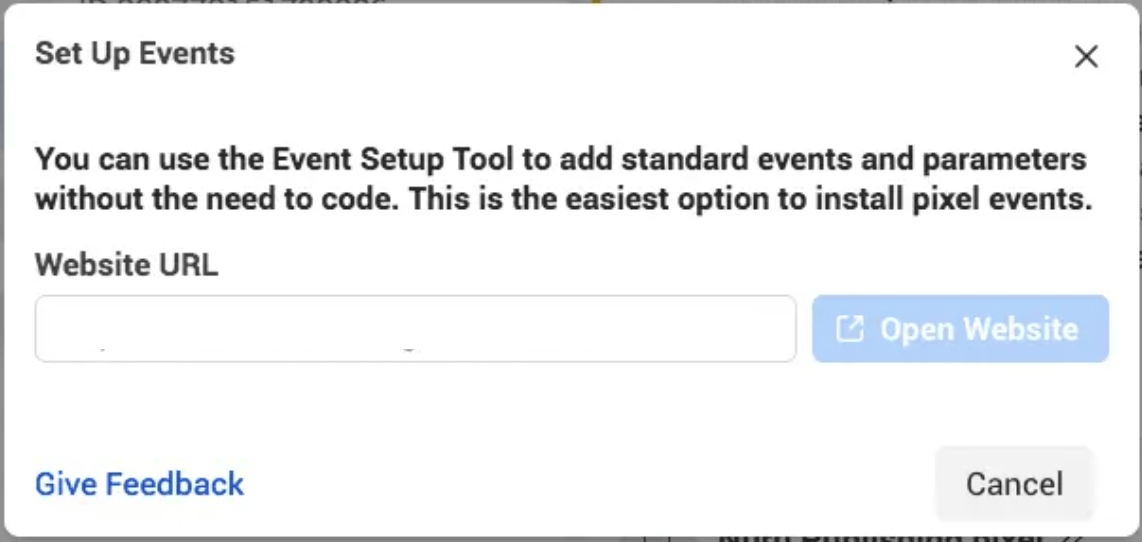
- Scroll down to the “Event Setup” section and click “Set up new events.”
- Choose between “Track events automatically” or “Track events manually” based on your preferences and follow the prompts to configure your conversion events.


Integrating Facebook Ads with other platforms
By integrating Facebook Ads with other platforms and marketing tools, you can create a seamless marketing ecosystem that maximizes the reach and impact of your campaigns.
Email Marketing Integration:
- Connect your email marketing platform (e.g., MailChimp, Constant Contact, or SendinBlue) with your Facebook Business Manager account to synchronize your email lists with Facebook Custom Audiences.
- Follow the integration steps provided by your email marketing platform to establish the connection and enable seamless data transfer between the two systems.
CRM Integration:
- Integrate your Customer Relationship Management (CRM) platform (e.g., Salesforce, HubSpot, or Zoho) with your Facebook Business Manager account to keep your customer data up-to-date and enable advanced targeting options.
- Follow the integration steps provided by your CRM platform to establish the connection and enable seamless data transfer between the two systems.
Analytics and Attribution Integration:
- Connect your analytics and attribution platforms (e.g., Google Analytics, Adobe Analytics, or AppsFlyer) with your Facebook Business Manager account to track the performance of your Facebook Ads campaigns and gain deeper insights into your marketing efforts.
- Follow the integration steps provided by your analytics and attribution platform to establish the connection and enable seamless data transfer between the two systems.
As you integrate these various tools and platforms with your Facebook Business Manager account, you’ll create a unified, powerful marketing ecosystem that allows you to manage, analyze, and optimize your campaigns with ease.
By connecting the dots between different marketing channels, you’ll gain a more holistic understanding of your customers’ journey.
Empowering you to make more informed decisions and deliver targeted, effective marketing messages.
Armed with the knowledge and tools you’ve acquired thus far, you’ll be well-prepared to harness the full potential of Facebook Ads and conquer your marketing goals.
Leveraging Facebook Ads for Business Growth
As our marketing adventure progresses, we now find ourselves exploring the vast and powerful realm of Facebook Ads.
Here we discuss the role of Facebook Ads in your marketing strategies.
Learn how to target potential customers with ad campaigns AND measure the effectiveness and ROI of your Facebook Ads.
The Role of Facebook Ads in Your Marketing Strategies
Facebook Ads play a crucial role in your marketing strategies, as they offer unparalleled targeting capabilities, extensive reach, and robust performance tracking.
By leveraging Facebook Ads, you can:
- Increase brand awareness: Reach a wider audience and introduce your brand to potential customers who may not be familiar with your products or services.
- Drive website traffic: Encourage users to visit your website, explore your offerings, and take desired actions such as making a purchase or signing up for a newsletter.
- Generate leads: Collect valuable contact information from potential customers who express interest in your business.
- Boost sales and conversions: Drive revenue by targeting users who are most likely to make a purchase or engage with your brand.
Targeting Potential Customers with Ad Campaigns
Facebook Ads’ advanced targeting capabilities enable you to reach the right audience with precision and efficiency.
To target potential customers with ad campaigns, follow these steps:
- Define your target audience: Identify the characteristics of your ideal customer, such as demographics, interests, and behaviors.
- Create Custom Audiences: Use your existing customer data, such as email lists or website visitors, to create Custom Audiences that match your target audience’s characteristics.
- Utilize Lookalike Audiences: Expand your reach by creating Lookalike Audiences, which are groups of users who share similar traits with your Custom Audiences.
- Refine your targeting with detailed options: Use Facebook’s detailed targeting options, such as age, location, interests, and behaviors, to further refine your audience.
- Monitor and adjust your targeting: Continuously analyze your ad performance, and make necessary adjustments to your targeting to optimize your campaigns.
Measuring the Effectiveness and ROI of your Facebook Ads
To assess the effectiveness and ROI of your Facebook Ads, consider the following steps:
- Set clear goals and KPIs: Define specific, measurable objectives for your campaigns, and establish Key Performance Indicators (KPIs) to track your progress toward those goals.
- Monitor your ad performance: Use Facebook Ads Manager to review your ad performance, including metrics such as reach, impressions, clicks, and conversions.
- Analyze your conversion data: Track your conversions using Facebook Pixel or other analytics tools, and examine metrics such as cost per conversion and conversion rate.
- Calculate your ROI: Determine your return on investment by comparing the revenue generated by your ads to the total ad spend. ROI can be calculated using the formula: ROI = (Revenue – Ad Spend) / Ad Spend * 100.
- Optimize your campaigns: Use your performance data and insights to refine your ad creatives, targeting, and bidding strategies, ensuring your campaigns are as effective and efficient as possible.
By leveraging the power of Facebook Ads, you can reach your target audience, drive business growth, and achieve your marketing objectives.
As you continue to hone your skills and optimize your campaigns, you’ll unlock new levels of success in the ever-evolving digital marketing landscape.
With a strong foundation built inside the Business Manager, understanding Facebook Page management, and FB ads best practices, you are now well-equipped to conquer the challenges ahead and emerge as a leader in your industry.
Conclusion
As we reach the end of our journey through the world of Facebook Business Manager, it’s essential to recap the key points and insights we’ve uncovered along the way.
With a deeper understanding of this powerful platform and the tools it provides, you’re now equipped to take your marketing efforts to new heights.
Recap of the importance of Facebook Business Manager
The Facebook Business Manager is an indispensable tool for businesses of all sizes and industries, as it enables you to:
- Centralize and streamline the management of your Facebook assets, including Pages, ad accounts, and Instagram and WhatsApp accounts.
- Collaborate with team members and assign roles and permissions to ensure a secure and efficient workflow.
- Optimize your Facebook Page for maximum visibility, engagement, and reach, fostering a strong and loyal audience base.
- Seamlessly integrate other tools and platforms, such as email marketing, CRM, and analytics solutions, to create a unified marketing ecosystem.
- Leverage the power of Facebook Ads to reach your target audience, drive conversions, and grow your business.
Take advantage of the tools provided by Facebook Business Manager
To fully employ the potential of Facebook Business Manager and propel your marketing efforts forward, remember to:
- Set up and optimize your Facebook Business Account and Page, ensuring your brand’s online presence is polished, professional, and engaging.
- Utilize Facebook Page Manager to manage multiple pages and accounts, schedule and publish posts, analyze insights and performance metrics, and respond to messages and comments.
- Integrate your Instagram and WhatsApp accounts to streamline the management of all three platforms and create a cohesive brand presence across channels.
- Implement Facebook Pixel to track user behavior and conversions on your website, providing valuable insights for optimizing your ad campaigns and improving your marketing ROI.
- Connect your email marketing, CRM, and analytics platforms to create a seamless marketing ecosystem that maximizes the reach and impact of your campaigns.
- Launch advanced targeting techniques, such as Custom and Lookalike Audiences, to ensure your Facebook Ads reach the right users and deliver optimal results.
In summary, Facebook Business Manager is a powerful ally in your marketing arsenal.
By mastering the platform’s tools and capabilities, you can drive business growth, engage with your target audience, and achieve lasting success.
With the knowledge and insights you’ve gained throughout this guide, you’re now poised to embrace the full potential of your BM and emerge as champion in your vertical.
Like the eCommerce Agency we are… It’s time for you to spread your wings, and go on your own social media marketing adventure to unlock the treasures that await you!


Thanks for your insight for the great written piece. I am glad I have taken the time to read this.